Code
import numpy as np
import pandas as pd
import matplotlib.pyplot as plt
import matplotlib as mpl
import matplotlib.patches as mpatches
from PIL import Image

mpl.rcParams['figure.max_open_warning'] = 100import numpy as np
import pandas as pd
import matplotlib.pyplot as plt
import matplotlib as mpl
import matplotlib.patches as mpatches
from PIL import Image
mpl.rcParams['figure.max_open_warning'] = 100Recently, someone asked me to remind them how categorical embeddings work. I began to explain how I thought of them, and the mechanics of “training” embeddings, but the look on my counterpart’s face was enough to let me know that I didn’t understand them as well as I thought I did. After our conversation, I turned to the internet to try to sharpen my understanding about some of the fuzzy aspects of embeddings, but found that most resources were either dense with NLP jargon, or specific to Word2vec. Both topics are certainly worth studying, but stood in the way of me grasping the fundamentals of embeddings.
I resonate with the sentiment Richard Feynman evokes in his famous quote,
“What I cannot create, I do not understand.”
so naturally, I set out to boil categorical embeddings down to the simplest case, and implement them myself. This post will cover the subtle details of training embeddings on a toy example, using NumPy. I imagine this will be most helpful to individuals who know a bit about embeddings, or perhaps have even used them with PyTorch or Keras, but haven’t themselves delved into the nuances. My intent here is to cut through the noise and zero in on exactly what it means to train embeddings (spoiler: you don’t need to be doing NLP to leverage them).
The code below is optimized for simplicity and readability, not for algorithmic efficiency. In other words, get ready for some for-loops!
In the spirit of Feynman, let’s build this from the ground up. We’ll start with simple Logistic Regression, then add embeddings in the next section.
Assume that we are interested in training a binary classifier on this dataset below.
# initializing dataset
obs1 = [-1]
obs2 = [3]
obs3 = [-2]
obs4 = [4]
X = np.array([obs1, obs2, obs3, obs4])
y = np.array([[0], [1], [0], [1]])

# initializing logistic regression parameter
w = np.array([[-0.75]])

# wrapping in pd.DataFrame for nice printing
pd.DataFrame(np.hstack([X, y]), columns=["x", "y"])| x | y | |
|---|---|---|
| 0 | -1 | 0 |
| 1 | 3 | 1 |
| 2 | -2 | 0 |
| 3 | 4 | 1 |
From a quick glance, it appears that observations from class 0 tend to have negative values, and observations from class 1 tend to have positive values. This dataset should be easy to classify. Now, let’s put together a few functions to perform logistic regression.
{% include info.html text=“Note: I won’t be covering the log-likelihood function’s details, but the inclined reader can find its derivation at the link in the docstring below.” %}
def sigmoid(z):
    """
    https://en.wikipedia.org/wiki/Sigmoid_function
    """
    return 1 / (1 + np.exp(-z))

def predict_proba(X, w):
    """
    Mimics Scikit-Learn's .predict_proba() method.
    https://scikit-learn.org/stable/modules/generated/sklearn.linear_model.LogisticRegression.html#sklearn.linear_model.LogisticRegression.predict_proba
    """
    return sigmoid(np.dot(X, w))

def nll(y, y_hat):
    """
    This calculates the negative log likelihood of the data,
    which is the loss functions we'll minimize.
    https://web.stanford.edu/class/archive/cs/cs109/cs109.1166/pdfs/40%20LogisticRegression.pdf
    """
    m = y.shape[0]
    loss = -(1/m) * ((y*np.log(y_hat)) + ((1-y)*np.log(1-y_hat))).sum()
    return loss

def nll_gradient(X, y, w):
    """
    This calculates the gradient of the negative log likelihood
    function. (specifically, with respect to the weights)
    """
    m = y.shape[0]
    gradient = -(1/m) * ((y - predict_proba(X, w)) * X).sum()
    return np.array([[gradient]])
Above, the sigmoid(z) function is an inherent piece of the Logistic Regression model. In addition, the predict_proba(X, w) function mimic’s Scikit-Learn’s .predict_proba() functionality, using the data, X, and the learned weight, w, to predict the probability of the target, y. Finally, the nll(y, y_hat) and nll_gradient(X, y, w) functions compute the loss associated with our model and the gradient of that loss, respectively, which are used to update our weight, w.
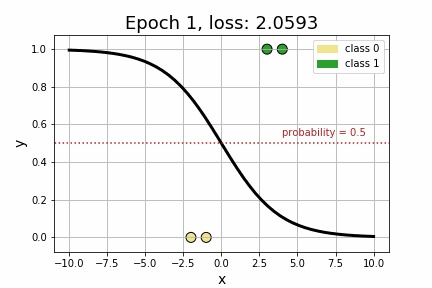
def plot_decision_boundary(X, y, w, epoch=0, loss=0, save=False, file_path="../images/2020-05-14-embeddings/log_reg/", show=False):
    x = np.linspace(-10, 10).reshape(-1, 1)
    pred_line = predict_proba(x, w)

    # plot formatting
    plt.plot(x, pred_line, linewidth=3, c='black')
    plt.scatter(X, y, c=["khaki", "tab:green"]*2, edgecolors="black", s=100)
    plt.axhline(0.5, -10, 10, c='firebrick', linestyle="dotted")
    plt.text(4, 0.54, "probability = 0.5", c='firebrick')
    plt.grid()
    plt.title(f"Epoch {epoch+1}, loss: {round(loss, 4)}", fontsize=18)
    plt.xlabel("x", fontsize=14)
    plt.ylabel("y", fontsize=14)
    class_0 = mpatches.Patch(color="khaki", label="class 0")
    class_1 = mpatches.Patch(color="tab:green", label="class 1")
    plt.legend(handles=[class_0, class_1])

    # saving/showing fig
    if save:
        plt.savefig(file_path + f"{epoch+1}.png")
    if show:
        plt.show()
    plt.clf()


def save_gif(file_path="../images/2020-05-14-embeddings/log_reg/", epochs=10):
    images = [Image.open(file_path + f"{epoch+1}.png") for epoch in range(epochs)]
    images[0].save(file_path + "log_reg.gif", save_all=True, append_images=[im for im in images], optimize=False, duration=300, loop=0)
With these functions, we can then proceed with our training loop, which will use vanilla gradient descent to find the optimal weight, w, which minimizes the negative log likelihood function. Explicitly, the update rule is as follows,
\[ \begin{aligned} w &\leftarrow w - \alpha \cdot \frac{\partial \text{ loss function}}{\partial\ w}\\ \end{aligned} \]
def training_loop(X, y, w, learning_rate=0.1, epochs=20, verbose=True):
    for i in range(epochs):
        y_hat = predict_proba(X, w)
        loss = nll(y, y_hat)
        w = w - (learning_rate * nll_gradient(X, y, w))
        plot_decision_boundary(X, y, w, epoch=i, loss=loss, save=True)
        if verbose:
            if i % 5 == 0:
                print(f"epoch {i} loss: {round(loss, 4)}")
    save_gif(epochs=epochs)
    return w
w_optimal = training_loop(X, y, w, epochs=40)epoch 0 loss: 2.0593
epoch 5 loss: 0.5455
epoch 10 loss: 0.278
epoch 15 loss: 0.1981
epoch 20 loss: 0.1588
epoch 25 loss: 0.1349
epoch 30 loss: 0.1185
epoch 35 loss: 0.1064<Figure size 432x288 with 0 Axes>As we can see by the strictly decreasing loss of our model, printed every 5 iterations, it appears that our model has converged to its optimum! Perhaps more compelling, however, is to visually see how the decision boundary, governed by w, changed across each iteration.
Now that we’ve got a handle on Logistic Regression, let’s add some embeddings to the mix. Suppose, for example, that we extend our toy dataset to also include a categorical variable.
| category | \(x_1\) | \(y\) |
|---|---|---|
| A | -1 | 0 |
| B | 3 | 1 |
| C | -2 | 0 |
| D | 4 | 1 |
Given that each datapoint reigns from a different category, we may not be able to get much predictive power out of this new categorical variable, however, we can leverage embeddings to express the relationship between these categories, with respect to their target, y, in a higher-dimensional, continuous space (as opposed to the one-dimensional, discrete space that they exist in currently).
The first step towards using embeddings in this manner is to substitute each unique category in the dataset with a unique n dimensional vector (in this case, n==2). We simply intialize them as zeros.
| \(e_1\) | \(e_2\) | \(x_1\) | \(y\) |
|---|---|---|---|
| 0 | 0 | -1 | 0 |
| 0 | 0 | 3 | 1 |
| 0 | 0 | -2 | 0 |
| 0 | 0 | 4 | 1 |
To be precise, \(e_1\) represents the first dimension of the categorical embedding, and \(e_2\) represents the second dimension, while \(x_1\) is the same numeric variable that we had in our example above.
# initializing dataset
obs1 = [0, 0] + [-1]
obs2 = [0, 0] + [3]
obs3 = [0, 0] + [-2]
obs4 = [0, 0] + [4]
X = np.array([obs1, obs2, obs3, obs4])
y = np.array([[0], [1], [0], [1]])

# initializing log reg parameters
w = np.array([[0.5],
              [-0.25],
              [-0.75]])

# pd.DataFrame(np.hstack([X, y]), columns=["e_1", "e_2", "x_3", "y"])
Then, you can train a logistic regression model to classify the data points as normal, treating \(e_1\) and \(e_2\) as features in the dataset. The only difference is that instead of just updating the weights on each gradient descent loop, you also update the embeddings. Explicitly, the update rules are:
\[ \begin{aligned} w &\leftarrow w - \alpha \cdot \frac{\partial \text{ loss function}}{\partial\ w}\\ e_1 &\leftarrow e_1 - \alpha \cdot \frac{\partial \text{ loss function}}{\partial\ e_1}\\ e_2 &\leftarrow e_2 - \alpha \cdot \frac{\partial \text{ loss function}}{\partial\ e_2} \end{aligned} \]
This is somewhat counterintuitive - we’re essentially changing the data! As each parameter is updated, embeddings for categories with similar characteristics remain close to each other in the new 2-dimensional space we’ve mapped them to. With this in mind, we should expect the embeddings for data points from class 0 (categories A and C) to be similar to one another, while different from those in class 1 (categories B and D).
Finally, we’ll define some new functions that compute the gradient of our loss function with respect to each Logistic Regression parameter (there are now 3, one for each feature), and our embedding vectors, \(<e_1, e_2>\).
def nll_gradient_weights(X, y, w):
    """
    Calculates the gradient of the negative log likelihood
    function with respect to the weights.
    """
    m = X.shape[0]
    gradient = (-(1/m) * ((y - predict_proba(X, w)) * X).sum(axis=0)).reshape(-1, 1)
    return gradient

def nll_gradient_embeddings(X, y, w, n_embeddings=4, emb_size=2):
    """
    Calculates the gradient of the negative log likelihood
    function with respect to each embedding.
    The assumption is that the embeddings come at the beginning
    of each row.
    """
    m = X.shape[0]
    embedding_derivatives = []
    for i in range(m):
        embed_i_derivs = []
        for j in range(emb_size):
            derivative = (-((y[i, :] - predict_proba(X[i, :], w)) * w[j, :])).item()
            embed_i_derivs.append(derivative)
        embedding_derivatives.append(embed_i_derivs)
return np.array(embedding_derivatives)def plot_decision_boundary_embeddings(X, y, w, epoch=0, loss=0, save=False, file_path="../images/2020-05-14-embeddings/log_reg_embeddings/", show=False):
fig, ax = plt.subplots(1, 2, figsize=(12, 5));
colors = ["tab:blue", "tab:orange", "tab:green", "tab:red"]
categories = ["A", "B", "C", "D"]
alpha = 0.8
s = 100
# log reg decision boundary
x = np.linspace(-10, 10).reshape(-1, 1)
pred_line = predict_proba(x, w[2:, :])
ax[0].plot(x, pred_line, linewidth=3, c='black')
ax[0].scatter(X[:, 2:], y, c=colors, edgecolors="black", s=s, alpha=alpha)
ax[0].axhline(0.5, -10, 10, c='firebrick', linestyle="dotted")
ax[0].text(4, 0.54, "probability = 0.5", c='firebrick')
ax[0].grid()
# labels
ax[0].set_title(f"Impact of x_1 on decision boundary", fontsize=16)
ax[0].set(xlabel="x_1", ylabel="y")
ax[0].xaxis.get_label().set_fontsize(14)
ax[0].yaxis.get_label().set_fontsize(14)
# set legend
handles = []
for i, (color, category) in enumerate(zip(colors, categories)):
handles.append(mpatches.Patch(color=color, label=f"cat {category}", alpha=alpha))
ax[0].legend(handles=handles)
# embeddings plot
embeddings = X[:, :2]
ax[1].set_xlim(-1, 0.5)
ax[1].set_ylim(-0.5, 0.75)
for i, (color, category) in enumerate(zip(colors, categories)):
ax[1].scatter(X[i, 0], X[i, 1], label=f"cat {category}", alpha=alpha, s=s, edgecolors="black", c=color)
for i, (color, category) in enumerate(zip(colors, categories)):
ymin, ymax = ax[1].get_ylim()
xmin, xmax = ax[1].get_xlim()
ax[1].axvline(x=X[i, 0], ymin=0, ymax=(X[i, 1]-ymin) / (ymax-ymin), alpha=alpha, c=color, linestyle="dashed")
ax[1].axhline(y=X[i, 1], xmin=0, xmax=(X[i, 0]-xmin) / (xmax-xmin), alpha=alpha, c=color, linestyle="dashed")
ax[1].legend()
ax[1].grid()
# labels
ax[1].set_title(f"Embeddings", fontsize=16);
ax[1].set(xlabel="embedding dimension 1", ylabel="embedding dimension 2")
ax[1].xaxis.get_label().set_fontsize(14)
ax[1].yaxis.get_label().set_fontsize(14)
# fig-wide settings
fig.suptitle(f"Epoch: {epoch+1}, Log loss: {round(loss, 4)}\n", fontsize=18)
# saving/showing fig
if save:
plt.savefig(file_path + f"{epoch+1}.png")
if show:
plt.show()
plt.clf()With these new functions, leveraging the update rules above, we’re equipped to run our standard training loop.
def training_loop_embeddings(X, y, w, learning_rate=0.1, epochs=20, verbose=True):
    for i in range(epochs):
        y_hat = predict_proba(X, w)
        loss = nll(y, y_hat)

        # calculate new weights
        new_weights = w - (learning_rate * nll_gradient_weights(X, y, w))
        # calculate new embeddings
        new_embeddings = X[:, :2] - (learning_rate * nll_gradient_embeddings(X, y, w))

        # update weights and embeddings
        w = new_weights
        X = np.hstack([new_embeddings, X[:, 2:]])

        plot_decision_boundary_embeddings(X, y, w, epoch=i, loss=loss, save=True)
        if verbose:
            if i % 5 == 0:
                print(f"epoch {i} loss: {round(loss, 4)}")
    save_gif(file_path="../images/2020-05-14-embeddings/log_reg_embeddings/", epochs=epochs)
    return X, w
X_updated, w_optimal = training_loop_embeddings(X, y, w, epochs=40, verbose=False)Again, we may visually observe how the decision boundary (governed by w), with respect to our numeric variable, \(x_1\), changes across iteration. Equally telling is to plot how the embedding vector associated with each unique category is adjusted (shown on the right-hand side). As expected, the embeddings for data points from class 0 quickly diverge from those in class 1.
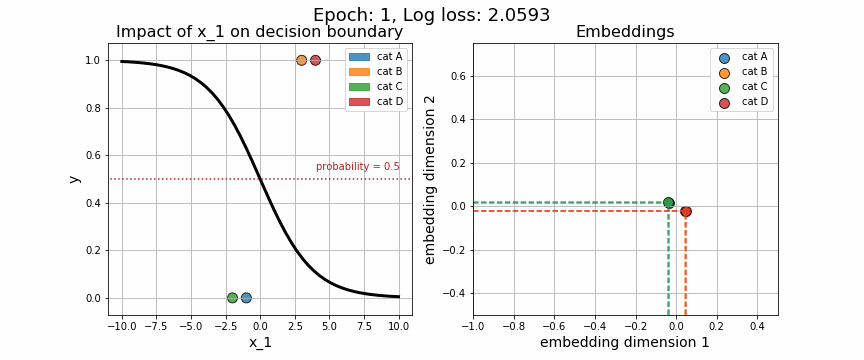
One of the strange characteristics of categorical embeddings is that there is no direct interpretation of the units on the x and y axes. Though interpretability has been somewhat clouded, it is useful to plot these trained embedding vectors to quantitatively measure how each of the categories stack up against one another.
It should be noted - we trained 2-dimensional vectors primarily because they are amenable to visual verificiation, but the same process can be employed to train embedding vectors of arbitrary length! In NLP tasks, it is common to train 50, 100, or 200 dimensional embeddings.